The education centre

Lighting, explained.

Plain answers to the questions people ask us about lighting, from picking a colour temperature to getting a BC Hydro rebate. Read one before a site visit and you’ll know exactly what to ask for.

Start here

Before you buy a light fixture, look for the CSA mark.

In BC, a light fixture has to carry a recognised certification mark, like CSA’s, before it can be installed. Fixtures bought online don’t always have one. Here’s how to check, and where to look a product up.

Guide 1

Look for the CSA mark before you buy.

Every light fixture installed in BC has to carry a certification mark from an agency accredited by the Standards Council of Canada, or an approval label from Technical Safety BC. That’s the law under section 21 of BC’s Electrical Safety Regulation, and it’s one of the things an electrical inspector checks.

The CSA mark is the one you’ll see most often in Canada. It means the product was tested and met the safety requirements it’s certified for. Other accredited agencies have their own marks, and Technical Safety BC publishes examples of the marks it accepts.

Why it matters

Fixtures sold online, especially ones shipped direct from overseas, don’t always carry a Canadian certification mark. An uncertified fixture hasn’t been tested to Canadian safety standards, and it isn’t approved for installation in BC.

How to check a fixture

  • Find the label on the fixture itself, usually inside the canopy or on the housing. A logo on the box isn’t enough.
  • Check that it covers Canada. CSA marks for electrical products show whether they cover Canada, the US, or both.
  • Look it up. Every product that carries a CSA mark is listed in CSA Group’s product listing.
  • Don’t modify it. Changing a fixture’s insides, for example with an LED conversion kit, can take it outside its certification. In BC that kind of retrofit needs approval through a permit.

Bought a fixture and not sure? Send us a photo of the label before install day and we’ll tell you.
Guide 2

Warm or cool light? Colour temperature, explained.

Kelvin (K) measures the colour of light, not its brightness. Lower numbers are warmer and more yellow, higher numbers are cooler and more blue. Most homes look best between 2700K and 3000K.

2200Kcandle2700Kwarm3000Ksoft4000Kneutral5000K+daylight
2700KWarm white. Like an old incandescent bulb. Living rooms, bedrooms, dining rooms.
3000KSoft white. Kitchens, bathrooms and outdoor lighting.
4000KNeutral white. Garages, workshops, offices.
5000KDaylight. Warehouses, shops and anywhere colour matters.

The most common mistake we see is mixed colours in one room: a warm pendant beside cool pot lights. Pick one and stick with it. Many LED fixtures now have a switch for three or five colours, so the choice can be made on install day.

Guide 3

Lumens, not watts.

Watts measure the power a light uses. Lumens measure the light it gives. With old bulbs the two moved together, so we all learned to shop by watts. With LED they don’t: an LED gives the same light as a 60-watt bulb on about 8 to 10 watts.

Old bulbLumensLED equivalent
40 W4505 to 6 W
60 W8008 to 10 W
75 W1,10011 to 13 W
100 W1,60016 to 20 W

Approximate. Check the lumens on the box.

Guide 4

Why some light makes things look wrong.

CRI, the colour rendering index, measures how true colours look under a light, on a scale up to 100. Daylight is 100. Cheap LEDs can make skin look grey and food look flat even when they’re plenty bright.

For homes, look for a CRI of 90 or more in kitchens and bathrooms. 80 or more is fine for garages and most commercial spaces. Shops, salons and restaurants usually want 90 or more.

Guide 5

Layers of light.

A room that feels right almost always has three kinds of light working together.

  • Ambient: the general light in the room, usually pot lights or a ceiling fixture. It should dim.
  • Task: light where you work, close to the job, so you’re never in your own shadow.
  • Accent: pendants, lamps and lights that show off a feature and make the room feel finished.

Most rooms that feel wrong are missing one layer. A kitchen with only pot lights has no task light on the counter; a living room with only a ceiling fixture has nothing to make it cosy. See residential lighting.

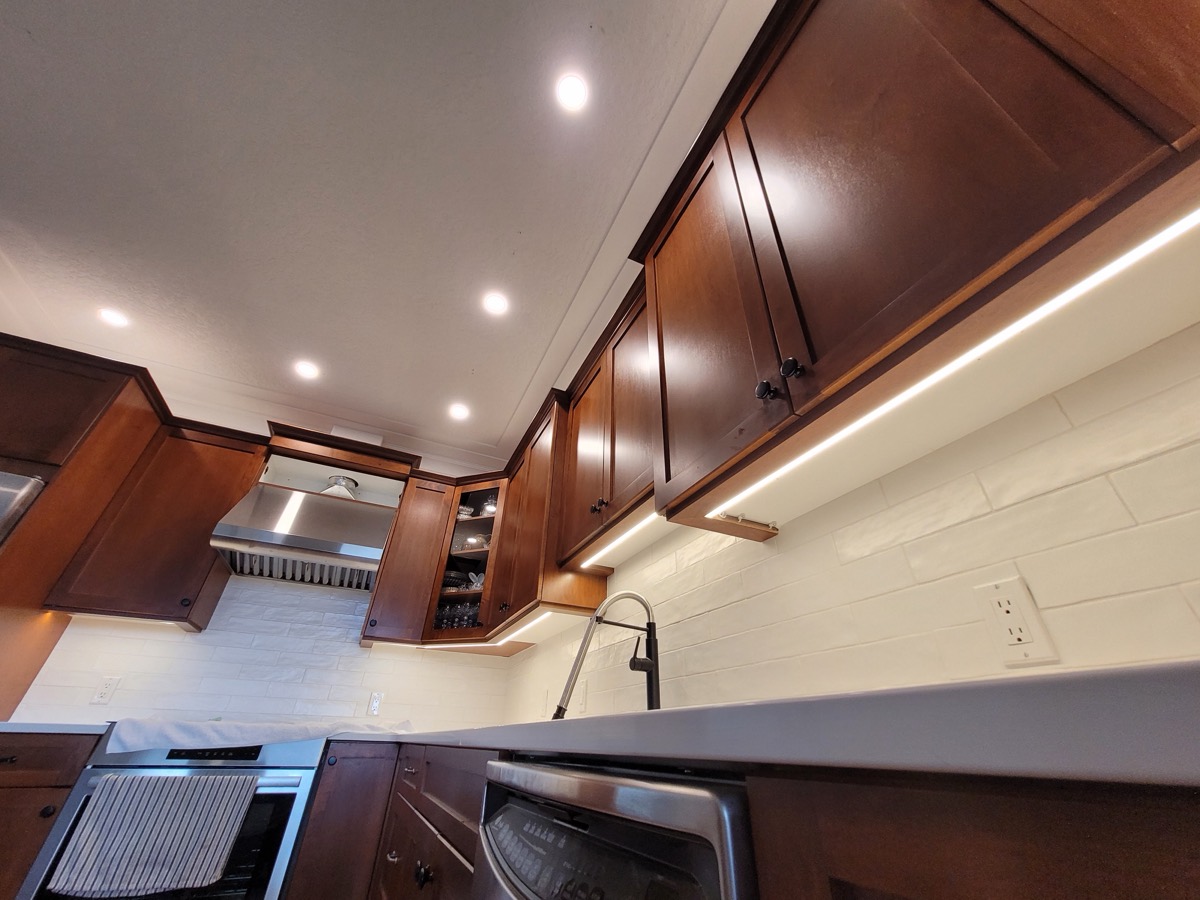
Pot lights and warm under-cabinet lighting in a kitchen with dark wood cabinets.

Guide 6

Will this LED dim? Bulbs, fixtures and dimmers.

Not every LED dims, and not every dimmer works with LEDs. A mismatch shows up as flicker, a buzz, lights that won’t dim all the way down, or bulbs that fail early.

How to tell if an LED bulb is dimmable

  • Read the box. Dimmable bulbs say “Dimmable” on the package, often with a dimmer symbol. If it doesn’t say dimmable, treat it as not dimmable.
  • Look for the warning. Many non-dimmable bulbs say “Not for use with dimmers” in the small print on the box or the base of the bulb.
  • Keep non-dimmable bulbs off dimmers, even with the dimmer turned all the way up. They can flicker, buzz and burn out early.

Check the fixture’s packaging too

Many LED fixtures have the light built in: pot lights, slim “wafer” lights, under-cabinet strips and a lot of pendants. There’s no bulb to read, so the fixture’s box or spec sheet is where you find out. Look for the word “dimmable” and for the kind of dimmer it needs. Some list the dimmers they’ve been tested with.

Match the dimmer

  • Use a dimmer rated for LED. Dimmer makers publish lists of the bulbs and fixtures each dimmer works with.
  • Keep one bulb model on each dimmer. Mixed bulbs dim unevenly.
  • Check the dimmer’s minimum load. One or two LED bulbs can fall below it and flicker.

We match the dimmer to the fixtures on install day, so you don’t find out the hard way. If you’ve already bought bulbs or fixtures, keep the boxes for us.

Guide 7

How BC Hydro lighting rebates work.

BC Hydro’s Business Energy Saving Incentives (BESI) program pays businesses part of the cost of replacing old lighting with approved LED fixtures. The incentive is set by BC Hydro for each approved product and retrofit, and the cheque goes to the business.

  • Survey. Every fixture is counted, and each replacement is checked against BC Hydro’s eligible products and wattage limits.
  • Apply. You register with BC Hydro; your contractor drafts the proposal; you submit it.
  • Wait for approval. Nothing may be bought or installed before BC Hydro’s approval email arrives.
  • Install and declare. The work is done, and the installed fixtures and invoice go to BC Hydro.
  • Get paid. BC Hydro may inspect, then pays, usually about 4 to 6 weeks later.

The rule that costs the most money

Fixtures bought before approval are disqualified, and there is no appeal.

See how we handle it, with a sample report.

Guide 8

Permanent lights or holiday lights?

Holiday light stringsGemstone Lights permanent lighting
Every yearUp in November, down in JanuaryInstalled once
Ladder workEvery seasonNone after install
ColoursWhatever the string isAny colour or pattern, plus warm white
By dayClips and cords on showTrack colour-matched to your trim
Rest of the yearIn a boxEveryday lighting and security light

See Gemstone Lights permanent lighting.

Guide 9

Outdoor lighting for the valley.

Good outdoor lighting lights the ground, not the sky. It keeps the stars visible over the valley and keeps light out of the neighbours’ windows.

  • Choose warm colour outside: 3000K or lower
  • Use shielded fixtures that point down
  • Make it only as bright as the job needs
  • Put it on a timer or sensor so it’s on only when it’s useful

See outdoor and landscape lighting.

Guide 10

Do I need a permit for new lighting?

Electrical work in BC is regulated by Technical Safety BC, and much of it needs an electrical permit and an inspection. When a job needs one, we pull the permit and book the inspection. It’s part of the job, not an extra.

Not sure if yours does? Ask when you call; we’ll tell you.

Next step

Still have a question?

Call the office and ask. If it’s a good one, it might end up in here.